I'm a little late, but Happy New Year! It's 2015 and hopefully you are starting fresh with a positive outlook! We were dealt a little bit of a yucky hand late in the year that has inspired a series of posts for the blog. I am trying to put a positive spin on everything. When life hands you lemons and all that jazz!
I hope that you will continue to join me on my adventure! Until next time!

Monday, January 19, 2015

Monday, November 17, 2014
Detox Bath


Admittedly, I'm pretty new to the detox bath. I saw it on Pinterest and I've seen a few different variations, and I tried a fairly simple one. Epsom Salts and Baking Soda. Is it the miracle that people claim it is? Eh, probably not, but it does make a difference!
I used about 2 cups of Epsom Salts and 1 cup of Baking Soda. I totally eyeballed it. You need to sit in the hottest water you can stand for about 20 minutes. I usually take a bottle of water in with me, they say to drink plenty before and after, and that this will help draw out toxins and can help fight a cold/flu. Afterwards rinse off in cooler water.
I have done this quite a few times. I always do it in the evening because I get out of the bath feeling like cooked spaghetti and I always sleep great afterward! There are a lot of claims about it from sunburns to flu to hangovers. I can't weigh in on all that but I can tell you that it definatly helps me feel better if I'm sick (or to sleep better so I can fight it off!) and it is nice even when I'm not sick.
So wash your hands often, and if you get sick try this! (And follow any advice from your doctor! I'm not a medical professional, and I'm not claiming to be!)
Friday, September 26, 2014
Hyperemesis Gravidarum and my 6 tips!

With both of my pregnancies I suffered from "morning" (ha! try all day!) sickness. When I was pregnant with Goose, I rarely felt sick, but I threw up often. All day. Everyday. It didn't bother me, and didn't slow me down, I tried all the different tips that people told me about to ease it, but no such luck.
My second pregnancy....wow...just wow.
A few weeks after I found out I was pregnant I started to get queasy and vomit occasionally. I was prepared for that...but it got worse..and worse...and even worse. I was constantly throwing up (on the very very rare occasion that I went somewhere, I carried a bucket and I kept garbage bags in my purse and car) I couldn't keep ANYTHING down. I felt run down, and if I tried to get up and do anything I was dizzy. I was so sick that I made an appointment with the doctor. The first one I felt brushed off, and even though I love my doctor's office (I mean LOVE!) I was a wreck. Pants was with me and she told him to have me rest. I went back not even a week later, and I was severely dehydrated, and was told that I was literally starving. I had lost weight, and got an IV and an anti-nausea medication. Little did I know..that iv fluids would become my new normal. I had Hypermesis Gravidarum. It didn't go away, and it was SO hard.
You try to explain to people, and they just can't grasp it. After throwing up a lot with Goose, I thought I could handle any "morning" sickness with my 2nd pregnancy....ha!
I threw up. ALL. THE. TIME. I couldn't shower because I would get dizzy to the point of passing out, and throw up so badly that I was dizzy and needed help out of the bathroom. I couldn't drive. My 4 year old was taking care of me. It was awful (but super sweet of her). On the occasions I went anywhere, I would get dizzy to the point of passing out and leave, usually getting sick along the way. I did my best not to complain, and to try to keep up with my day to day and some kind of "normal" for Goose, but I was struggling.
It was frustrating because people would say "try crackers" and I wanted to scream. And when I was a little over half way they would say "try ginger ale" or "not much longer now!" I was so angry at those people! I know they meant well, and I'm glad they offered kind words..for the most part..but do you really think if ginger ale or crackers would "fix" this I would still be this sick?
All I wanted was to eat. I would sit and cry because all I wanted was to eat anything and not throw up until there wasn't even bile in my stomach. I ended up gaining NO weight, and I lost almost 18 lbs the last few weeks of my pregnancy and a couple weeks after Little Bear was born I was down almost 40 lbs. My last 2 weeks of pregnancy I had a regular coke, a couple chocolate milkshakes, and bottles of water. None of which stayed down.
I had no energy to be excited. Most of the time I was pretty sure I had ruined our lives. It didn't feel like it could get better but the thought of worse...it was unfathomable.
That is a lot to deal with, but being severely dehydrated you are a mess. I would cry, and have no tears. I couldn't focus. I would go for an IV and it was a struggle to get a vein. One time after being poked too many times to count they poked a final time and blood went everywhere. I could see the horror on my husband's face. I passed out when they took my blood for the glucose test, just to be told I had to do the 3 hour. I was depressed. I was disgusted. It took a toll on my family. Goose was terrified for me, and Pants had to work, and do it all. I worried that I'd ruined everything for Goose. I worried that this was harming the baby. I worried about the stress placed on everybody around me.
Looking back, I don't know how I made it, but I did. I wish that I could explain the horror of it. The strain on loved ones and the feelings of failure..but there is NO way.
I thought when I delivered I would be better, in fact I was craving my first meal after having her,(without being sick) I wanted a grilled cheese, fries and a chocolate shake! I was induced because they were worried about the stress on me, and of course the baby. It didn't work like that! It was a battle, I got better than I was, and able to do more, but I was still throwing up multiple times a day. Around the time she was 14 months old I started feeling better. I believe, in most cases it usually is "cured" by delivery, but not in my case. I found out after continuous vomiting that I ended up with bad reflux and a hiatal hernia, and will most likely end up with surgery to fix the hernia.
If you've never had morning sickness...yay! If you encounter somebody with morning sickness, please please puh-leasse don't suggest crackers! Or assume they are exaggerating. I had no idea about HG before pregnancy with C, it only affects about 1% of pregnancies. I'm here to help educate people because it was terrible and I had nobody who understood or had been there, and they tried but its not the same.
I tried a lot of different suggestions for morning sickness, including medication. Here are some things that helped me:
- Unisom (not gels!) plus 25mg of B6. I'd take a unisom at bed time and B6 every 8 hours. (This worked better than the medications like zofran which I also tried)
- Sour(ish) Candy- I was a fan of sour apple lollipops with the gum inside.
- If you aren't *craving* it-DON'T eat it. If crackers don't sound good..don't eat them!
- Don't get too hungry or full. I had to carry snacks at all time.
- Too warm or too cold can make "morning" sickness worse!
- Rest as much as possible
If you found this blog and you have HG..hugs, take any help you can get! If you don't have it....consider yourself lucky! Please feel free to contact me!
Wednesday, August 27, 2014
Stuffed Pizza Biscuits


It's Wednesday...what's for dinner? In our house, since Pants isn't home the girls decided on pizza biscuits. Technically, Goose and I are having pizza biscuits, C may eat one, but she is having scrambled eggs and a biscuit with strawberry jam. These are quick, easy, and yummy! (Made the same as my stuffed breakfast biscuits) they make a good snack food, or you can cheat and have them for supper like we did!

You'll need:
- 2 cans of biscuits
- Mozzarella (I used string cheese!)
- Pepperoni
- Any other "toppings" (or in this case, stuffings) you want
- 1 egg beaten
- Garlic powder and Italian Seasoning
Take one biscuit at a time, flatten it, and fill with cheese and pepperoni. Fold the biscuit around it, and set it seam side down in a baking dish. Try to leave a small space between biscuits. Continue until all the biscuits are filled. Brush the tops with the beaten egg and then sprinkle with garlic powder and italian seasoning. Bake according to directions on can (mine was bake at 350 for 15-17 mins, but they took about 20.)

Serve with pizza sauce and enjoy!


As always, I'd love to know your thoughts, here or on Facebook! Hope you enjoy!
Thursday, August 14, 2014
Cream Cheese Chicken Taquitos


I recently pinned a recipe for slow cooker cream cheese taquitos. (See it here!) I was skeptical since it seemed so simple, especially because some recipes seem a little bland to me, but I enjoyed it. They are perfect snack food, and both girls liked them too. I have already thought of a bunch of different ways to "kick it up a notch". I made the chicken the night before when I made chicken for dinner, and when it was done I put it in the fridge to use the next day, and it was very tasty! We dipped them in a salsa and a queso blanco dip. Yum!
I hope that you will give these a try and let me know what you thought either in a comment or on Facebook!
*UPDATE: I've made these a couple more times and we prefer the sharp cheddar cheese.*
Ingredients:
- 2 boneless skinless chicken breasts
- 1 teaspoon chili powder
- 1 teaspoon garlic powder
- 1 teaspoon cumin
- salt + pepper
- 8 ounces cream cheese
- ⅓ cup water
- ½ cup shredded colby or Mexican blend cheese (Next time I will use sharp cheddar)
- 12 6 inch corn or flour tortillas (we used flour)
- optional: cilantro, salsa, sour cream, or other toppings as desired (we like salsa or queso dip!)
How to:
Add chicken, chili powder, garlic powder, cumin, salt and pepper to taste, cream cheese, and water to crock pot. Cover and cook on low 8 hours or on high 4 hours.
minutes before serving, remove chicken from crock pot, shred with two forks, and return to slow cooker. Give it a stir. Let it cook about 15 minutes longer.
minutes before serving, remove chicken from crock pot, shred with two forks, and return to slow cooker. Give it a stir. Let it cook about 15 minutes longer.
Preheat oven to 400. Place about ¼ cup of the chicken mixture onto the middle of each tortilla. Top with 1-2 tablespoons shredded cheese. Roll tightly and place in a single layer on a greased baking sheet. Bake 10 minutes, until tortillas are slightly browned and shredded cheese is melted. Serve with desired toppings and sauces.
Monday, August 4, 2014
East Coast Cup of Tea

Whew! I am trying to blog on a regular schedule, but I've been one busy mumma! In the midst of all the things going on in my little world, I've started a new project in hopes to earn a little extra income. If you follow me on Facebook, you may have already been introduced to my new page East Coast Cup of Tea. I am doing mostly "rustic" signs, but also plan on including some digital files to print or framed prints, as well as some other items.

I love all the DIY projects on Pinterest...and I'm not alone, so one day, I mentioned to Pants that I'd love to have a few pallets. He told me he could get them for me when he got a chance and I left it at that...a month or so went by, and then one day I was sitting on my living room floor coloring with Goose and GirlBaby when I heard a truck pull up...
Imagine my surprise when I looked out the front window to find a flat bed tractor trailer with a TON of pallets. They were friends of Pants, and I tried explaining that I just wanted a few pallets to try a couple projects with....their response was amused laughter and to unload the pallets around back where he had asked them to put them. All 100 of them. ONE HUNDRED pallets!
Both of my girls watched amazed, with big eyes, and I called Pants and told him there were approximately a million pallets and they were in huge stacks in the back yard. He laughed, but I don't think he thought there were THAT many.
Pants came home from work, and I could tell he was surprised too, and when he went to count there were 100. We've shared, we've burned some, and there are still quite a few, so in an attempt to clear out the pallets (and hopefully earn a little extra money!) I've started creating some signs etc. So far, so good because I'm really enjoying it! Wish me luck!
Wednesday, July 16, 2014
Macaroni and Cheese- My oPINion
Hello again! Time for another oPINion!
For Father's Day, Pants requested homemade, baked macaroni and cheese. I decided to check Pinterest and decided on a recipe.... it's from the Pioneer Woman, and I haven't had a bad recipe from her yet, so it was the lucky winner! (See the origial pin here!) I've made it a few times since then and it's a crowd pleaser in our house! In her post, she says "DO NOT UNDER SALT" and it's true, don't! This is yummy, and not too hard to make, and pleases both the adults and children! It's creamy and cheesy and the cheese crust on the top is bubbly, and gives it great texture.
Give it a try, and as always, I'd love to know your thoughts either on Facebook or in the comments! Enjoy!


4 cups Dried Macaroni
For Father's Day, Pants requested homemade, baked macaroni and cheese. I decided to check Pinterest and decided on a recipe.... it's from the Pioneer Woman, and I haven't had a bad recipe from her yet, so it was the lucky winner! (See the origial pin here!) I've made it a few times since then and it's a crowd pleaser in our house! In her post, she says "DO NOT UNDER SALT" and it's true, don't! This is yummy, and not too hard to make, and pleases both the adults and children! It's creamy and cheesy and the cheese crust on the top is bubbly, and gives it great texture.
Give it a try, and as always, I'd love to know your thoughts either on Facebook or in the comments! Enjoy!

Ingredients:
4 cups Dried Macaroni
1 whole Egg Beaten
1/4 cup (1/2 Stick) Butter
1/4 cup All-purpose Flour
2-1/2 cups Whole Milk
2 teaspoons dry mustard (more to taste)
1 pound grated cheese
1/2 teaspoon Salt (More To Taste)
1/2 teaspoon Seasoned Salt (More To Taste, I used Lawry's)
1/2 teaspoon Ground Black Pepper
Cook macaroni until very firm and then drain. In a small bowl, beat the egg.
In a large pot, melt butter and sprinkle in flour. Whisk together over medium-low heat. Cook mixture for five minutes, whisking constantly. Don’t let it burn.
Pour in milk, and add ground mustard, whisk until smooth. Cook for five minutes until very thick. Reduce heat to low.
Take 1/4 cup of the sauce and slowly pour it into beaten egg, whisking constantly to avoid cooking eggs. Whisk together till smooth.
Pour egg mixture into sauce, whisking constantly. Stir until smooth.
Add in cheese and stir to melt.
Add salt and pepper. Taste sauce and add more salt and seasoned salt to taste.
Pour in drained, cooked macaroni and stir to combine. Pour into a baking dish, top with extra cheese, and bake for 20 to 25 minutes or until bubbly and golden on top.
It is good for dinner, and even better for lunch the next day! Yum!
Wednesday, June 25, 2014
Easy Teriyaki Marinade


Quite awhile ago, I posted a review for slow cooker Chicken Teriyaki. It was pretty good, but not quite the flavor I was looking for, so one night that I was making salmon for dinner I decided to experiment. I'm glad I did, because it was good! It's really easy, hope you like it!

I've stopped measuring when putting this together, but I estimated amounts for this "recipe".
Ingredients:
1 cup Teriyaki Sauce (I use Great Value)
3/4-1 cup Brown Sugar
3-5 cloves Garlic
Combine ingredients and pour over meat. I pour over meat and bake it until cooked through. It's especially yummy on salmon, and chicken, but we've used it on beef too and liked it! It's a good combination and I love the sweetness of the brown sugar. I hope that you try it and love it as much as we do! I'd love to hear your thoughts!
Sunday, March 9, 2014
Stuffed biscuits...an easy breakfast of champions!
So I'm always up for easy, yummy, filling breakfast ideas, and this is a winner in my house! Personally I'm not a huge fan of breakfast foods, (unless we are talking pancakes with sugar and bacon...mmmm!) but I do like to start the day off right for my little family. Goose and Pants request these almost every weekend and sometimes I make a ton so they can have them throughout the week. They are seriously SO easy!
Stuffed Biscuits
1 can of refrigerated biscuits (or more depending! )
Scrambled eggs (I use 2 large eggs)
Cheese (I use sharp cheddar, but american etc works too)
Bacon or crumbled sausage (I use the real bacon pieces)
Scramble the eggs and set aside. Take one biscuit and flatten it, and then top with cheese, bacon/sausage and egg.

Once the toppings are on the biscuit, form the biscuit into a ball around the toppings and place seam side down and bake according to the instructions on the biscuit can.


I don't have a picture of the finished product, because they were gobbled up as soon as they came out of the oven, but they look like a biscuit! I hope you like them! I have a couple variations I am going to try soon! Enjoy!
Monday, March 3, 2014
Well....hello there!
Well hello to the new followers, and to the hubs, he has been checking out the blog! (Hi Pants! LYTM!) I am trying my best to start blogging ona regular schedule....we'll see how that goes!
I have a couple posts in the works, a review, a recipe and a fun one! I am also working on dresses for my girls and a couple more printables for my Etsy shop! Of course I am always up for suggestions :)
More soon! This mumma is tired!
I have a couple posts in the works, a review, a recipe and a fun one! I am also working on dresses for my girls and a couple more printables for my Etsy shop! Of course I am always up for suggestions :)
More soon! This mumma is tired!
Friday, January 17, 2014
Loaded Baked Potato Soup


I love loaded potato recipes...skins, baked potato, mashed, soup..yum! I've seen a lot of loaded potato soup recipes floating around Pinterest (I've pinned quite a few!) and I decided to try one yesterday because it was cold and gray and dreary and I had all the stuff on hand.
I halved the recipe because they said it made a LOT of soup. It did make a good amount, plenty for us.
Bonus: it's a slow cooker soup!
Bonus: it's a slow cooker soup!
Ingredients:
2.5 lbs russet potatoes. I peeled them.
Half of a yellow onion
Garlic (I used already minced from a jar)
32 oz chicken stock
8 oz cream cheese
Salt and pepper
Shredded cheddar, bacon pieces and green onion to top with. I used the real bacon pieces you can buy in the bag...NOT crispy bacon bits!
In the crock pot, mix diced potatoes, chicken stock and garlic. The original recipe calls for tastefully simple garlic garlic, but I used about 4 tsp of garlic (half a teaspoon is about 1 clove, I could have put more, depends on your taste) I set it on high for about 5 hours. (7-8 hours on low) once the time was up I mashed the potatoes a bit and then ladled the soup into my blender and pureed it with the brick of cream cheese.
I poured it into bowls and topped it with all the yummy toppings I mentioned...and oh my goodness! So good! We each had a bowl with some leftover for lunch! It's one of my new favorite dinners! Seriously so good and easy! Check out the original pin here.
I'm already thinking of ways to switch it up! I hope you give it a try and enjoy it as much as we did!
Tuesday, December 31, 2013
Goodbye 2013!
So here we are in the final hours of 2013, and I'm looking forward to 2014. This year has NOT been an easy one for me. It has probably been the worst actually. It got off to a rough start and then Pants had his accident and post concussion syndrome. That was a scary time and he was out of work for a couple months. When I thought things were looking up, I lost my Toby cat. I've lost close friends, and my grandmother passed away. It has been hard, but there have also been good things. My GirlBaby turned one! My silly Goose turned 6! Pants threw me an amazing surprise party on my birthday. We had an unforgettable trip to Disney. I met my newest niece for the first time, and while tested by the struggles of the year, Pants and I came out on top. Our relationship is going strong and is better than ever. I'm proud of my little family. That being said.....this girl is ready for 2014.
We've had a lot of eye openers this year, so for 2014 I'm not making resolutions. I'm going to say I love you a lot. I want to laugh a lot. I want to play with my girls, see them learn. I'm giving second chances assuming they are deserved. I am going to be happy and take care of my family and do what I do! I'm hoping to get readers for the blog and I'm adding new items to etsy and doing a couple giveaways. Yay...C'mon 2014!!!!
Monday, December 16, 2013
Have a Holly Jolly Christmas...(printable!)
It's hard to believe that it's almost Christmas once again! I've gotten just about all of my shopping done, I have a couple small things to make, and a few gifts to wrap and I'm done! I'm enjoying the Christmas music, the baking and relaxing in the evenings by the tree and the fireplace.....it's good stuff.
That being said, I've been thinking a lot about this year. It's been a hard one. Possibly the hardest...I think it's making me appreciate Christmas and the season even more this year. I've decided to savor it. Do what makes me happy. I'm baking, and singing and decorating and wrapping gifts, I'm reading this amazing Night Before Christmas book to the girls each night, soaking up all the Christmas shows, and enjoying crafts....and one of the things I did in my down time was play around with making some chalkboard printables. I have more to add, but get this one here.

That being said, I've been thinking a lot about this year. It's been a hard one. Possibly the hardest...I think it's making me appreciate Christmas and the season even more this year. I've decided to savor it. Do what makes me happy. I'm baking, and singing and decorating and wrapping gifts, I'm reading this amazing Night Before Christmas book to the girls each night, soaking up all the Christmas shows, and enjoying crafts....and one of the things I did in my down time was play around with making some chalkboard printables. I have more to add, but get this one here.

Monday, December 9, 2013
Chocolate Chunk Brownie Cookies
I have been all about cookies lately, and these cookies...oh these cookies... For somebody who occasionally likes a cookie...these were hard to resist! They are made with brownie mix..and chocolate chunks...and oh my! For a soft chocolate chip cookie, try this recipe.

Try them.... Like today... So good!
Here goes:
Ingredients:
1 package (18 To 21 Oz. Box) Fudge Brownie Mix
1-¼ cup All-purpose Flour
¼ cups Packed Brown Sugar
2 whole Eggs
½ cups Butter, Melted And Cooled
2 Tablespoons Water, Or More As Needed
1 cup Dark Chocolate Chunks**
*I used semi sweet because I was sharing these and some people just don't understand my love of dark chocolate!*
1. Whisk together brownie mix, flour, and sugar.
2.Using a heavy spoon, stir in the eggs one at a time, followed by butter and 2 tablespoons water. If the batter appears like there is too much flour, add 1 more tablespoon of water. Batter will be very thick.
3. Fold in chocolate chunks
4. Cover and refrigerate for 2 hours.
5. Preheat oven to 350 degrees.
6. Grease a cookie sheet.
7. Drop heaping tablespoons of dough on the cookie sheet. You want pretty thick cookies here to get the brownie feel, about 3 inches apart. Press down slightly. Don’t flatten completely. Bake for 8-10 minutes.
8. Remove from oven, allow to cool 2 minutes on cookie sheet. Transfer to a cooling rack to cool completely.
One word...amazing!
Try them.... Like today... So good!
Here goes:
Ingredients:
1 package (18 To 21 Oz. Box) Fudge Brownie Mix
1-¼ cup All-purpose Flour
¼ cups Packed Brown Sugar
2 whole Eggs
½ cups Butter, Melted And Cooled
2 Tablespoons Water, Or More As Needed
1 cup Dark Chocolate Chunks**
*I used semi sweet because I was sharing these and some people just don't understand my love of dark chocolate!*
1. Whisk together brownie mix, flour, and sugar.
2.Using a heavy spoon, stir in the eggs one at a time, followed by butter and 2 tablespoons water. If the batter appears like there is too much flour, add 1 more tablespoon of water. Batter will be very thick.
3. Fold in chocolate chunks
4. Cover and refrigerate for 2 hours.
5. Preheat oven to 350 degrees.
6. Grease a cookie sheet.
7. Drop heaping tablespoons of dough on the cookie sheet. You want pretty thick cookies here to get the brownie feel, about 3 inches apart. Press down slightly. Don’t flatten completely. Bake for 8-10 minutes.
8. Remove from oven, allow to cool 2 minutes on cookie sheet. Transfer to a cooling rack to cool completely.
One word...amazing!
Sunday, October 6, 2013
The mouse and the cookie...Pudding Mix Soft Chocolate Chip Cookies
So remember the cookies I told you about? I was hoping to share the recipe before we went to Disney, but it was our anniversary, Goose was sick, and GirlBaby was throwing up...lucky me caught a hellish stomach bug, and couldn't move let alone blog, or pack! Ugh! However, we made it, and had a fabulous time at Disney (that is a different post, but soooo fun!) We are back, and here is the recipe I promised!

1 cup softened butter
3/4 cup brown sugar
1/4 cup sugar
3.4 oz package vanilla instant pudding mix
2 eggs
1 tsp vanilla
2 1/4 cups flour
1 tsp baking soda
2 cups semi-sweet chocolate chips
Preheat oven to 350. Cream together butter and sugar. Add pudding mix and vanilla. Beat in one egg at a time. In a separate bowl, mix together flour and baking soda. Slowly combine wet and dry ingredients. Stir in chocolate chips. Spoon onto baking sheet and bake for 8-10 minutes!
They have a good flavor, but the texture....oh how soft and chewy! I shared them with my parents and they really enjoyed them...not to mention our house gobbled them up! Try them! Let me know what you think!

Wednesday, September 18, 2013
If you give a mouse a cookie?
Wow! We've been busy! We are going to Disney soon and Goose and I are super excited. Pants is excited but not nearly on the same level, and the baby has no idea-ha! Just wait until she is there though... *insert slightly ridiculous little kid grin* So..I've been focusing on planning our trip (or attempting to plan, how do I know what the days will bring and if kids will be tired out for dinner reservations?) I am also making shirts for the littles. :)
I've been working on Etsy and trying to sort out insurance (Pants switched jobs and our pediatrician doesn't take our new health insurance, but I was able to work it all out-yay!) I have also been on the hunt for the perfect chocolate chip cookie recipe. I have tried a ton, and had one I thought was *the one!* but then, I saw a new recipe that I was compelled to try and man, oh man..it is a toss up. I will have the recipe and reviews posted in a few days, and you can decide for yourself!
Until then...
I've been working on Etsy and trying to sort out insurance (Pants switched jobs and our pediatrician doesn't take our new health insurance, but I was able to work it all out-yay!) I have also been on the hunt for the perfect chocolate chip cookie recipe. I have tried a ton, and had one I thought was *the one!* but then, I saw a new recipe that I was compelled to try and man, oh man..it is a toss up. I will have the recipe and reviews posted in a few days, and you can decide for yourself!
Until then...
Thursday, August 29, 2013
The kitten.
Recently, on a trip to Florida (July) we decided to adopt a kitten. I was still a mess after losing my Toby Cat, and I didn't really want a cat. Then, I met this cat...he looked a lot like Toby did when I saw him for the first time so I had to ask about him. I found out he was born on my birthday, and his name was Keith...(Toby Keith inspired Toby's name). Well, we adopted him for Goose and GirlBaby. The girls love him, and he loves them!

We had a hard time deciding on a name...I wanted to name him Feeny. (Yes, I love Boy Meets World) but it didn't seem to fit. Then we thought Desi..(Desi Armaz...Ricky Ricardo) but it just didn't click for me..but the baby would point and exclaim Kitty!! She did this one day and it reminded me of the movie Monsters Inc, so we ended up naming him Sullivan after the James P. Sullivan character.
So here he is, meet our new kitty Sullivan. He has been with us a month and a half and so far so good!

Sunday, August 18, 2013
My oPINion: slow cooker teriyaki chicken
Hi all! It's another recipe review for my opinion! A slow cooker recipe so it's even better!
I recently found a pin for slow cooker teriyaki chicken (find it here) I was intrigued and had a bunch of chicken to use so I made some plain chicken in the crock pot to use for other recipes, and in my other crock pot with the other half of the chicken I made the teriyaki chicken. I was actually surprised, it was pretty good! We served it over rice. Plus it took maybe 5 minutes to put together. So easy and I had the ingredients on hand!
Here is the recipe:
I recently found a pin for slow cooker teriyaki chicken (find it here) I was intrigued and had a bunch of chicken to use so I made some plain chicken in the crock pot to use for other recipes, and in my other crock pot with the other half of the chicken I made the teriyaki chicken. I was actually surprised, it was pretty good! We served it over rice. Plus it took maybe 5 minutes to put together. So easy and I had the ingredients on hand!
Here is the recipe:
Ingredíents
| 1 | lbs chícken, díced |
| 1 | cup chícken broth |
| ½ | cup teríyakí sauce |
| ⅓ | cup brown sugar |
| 3 | garlíc cloves, mínced |
1. Combíne chícken broth, teríyakí sauce, brown sugar and garlíc cloves ín large bowl.
2. Add chícken to sauce, and toss to combíne.
3. Pour chícken míxture ínto crock-pot.
4. Cook on low 4-6 hours, or untíl chícken ís cooked through.
5. Serve over hot cooked ríce and spoon extra sauce íf desíred
What do you think? Is this a recipe you would try? If you try it, I'd love to know what you think!
Tuesday, August 6, 2013
My o'PIN'ion: Garlic/Brown Sugar Chicken
I always pin a ton of recipes, and wonder..are they really as good as they sound? Obviously opinions differ, but in my "oPINion" posts, I'm going to take pins from pinterest and review them, and you can decide for yourself, or feel free to comment with your opinions! I'd love to hear them!
So, the brown sugar/garlic chicken...in my head this sounded so good. I had pinned an easy recipe (see it, here) and was looking forward to trying it. I followed the instructions and got it in the oven and it smelled sooo good! I couldn't wait to try it...sadly, when I did try it, it didn't taste anything like it smelled. It was very bland, and the bites that did have flavor were just...odd. I was really let down because it honestly smelled SO good, almost like Chinese food. It wasn't bad tasting, it was okay, just really a let down compared to the smell. Even Pants said it was "different" and he will eat almost anything! We all ate it, but I probably wouldn't ever make it again. I did see a different slow cooker version of the recipe (check it out here) with more ingredients that sounds like it would have a lot more flavor, and taste more like it smelled, and I am considering giving it a shot. I will update this post when I try it.
Have you tried a version of this recipe? What were your thoughts?
So, the brown sugar/garlic chicken...in my head this sounded so good. I had pinned an easy recipe (see it, here) and was looking forward to trying it. I followed the instructions and got it in the oven and it smelled sooo good! I couldn't wait to try it...sadly, when I did try it, it didn't taste anything like it smelled. It was very bland, and the bites that did have flavor were just...odd. I was really let down because it honestly smelled SO good, almost like Chinese food. It wasn't bad tasting, it was okay, just really a let down compared to the smell. Even Pants said it was "different" and he will eat almost anything! We all ate it, but I probably wouldn't ever make it again. I did see a different slow cooker version of the recipe (check it out here) with more ingredients that sounds like it would have a lot more flavor, and taste more like it smelled, and I am considering giving it a shot. I will update this post when I try it.
Have you tried a version of this recipe? What were your thoughts?
Saturday, July 27, 2013
Valances
I've been wanting some valances for our kitchen, but haven't found any that I love. So after finding some fun fabric, Pants and I made some valances! They took about 20 mins and only cost as much as the yard of fabric since we already had foam board. I used foam board left over from a home improvement project, less than a yard of fabric and straight pins!
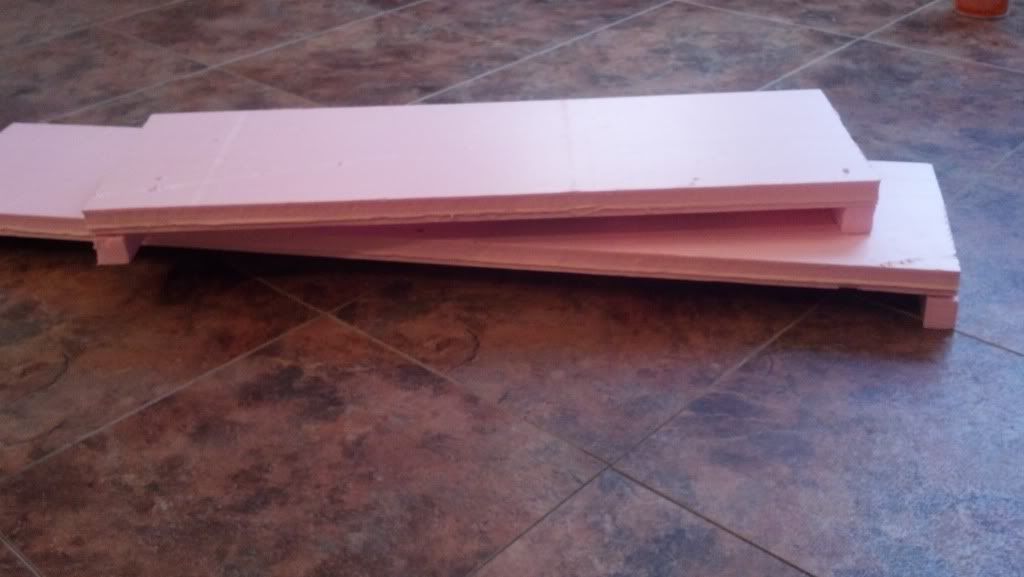
First I measured the window, and we added 2 inches. We cut a piece of foam to go across the front of the window, and one inch pieces to box it in. Like in this picture:

Once the pieces were put together we ended up with this:


First I measured the window, and we added 2 inches. We cut a piece of foam to go across the front of the window, and one inch pieces to box it in. Like in this picture:

Once the pieces were put together we ended up with this:
I then laid these on the fabric and cut it to fit and pinned it to cover the foam. I forgot to take pictures of this step, sorry! Once the fabric was pinned I ended up with this:

It was super easy, took no time at all, and we like how they turned out!
Subscribe to:
Posts (Atom)